Note: Basic types of Pipes built-in Angular has already been explained in detail (this is chapter 2 of pipes)which you can see on below link
For further update I would suggest you all to follow our blog and by email also so that you could get email notification for new posts
What is Pipe in Angular?
Pipes were earlier called filters in Angular1 but from Angular 2 onwards they renamed it to Pipe. The main purpose of creating pipe is to provide developers to transform data.
The “|” character is used to transform data
Syntax:
{{ This is My First Pipe | lowercase }}
The function accepts various types of input, such as integers, strings, arrays, and dates, which are provided as a '|' separated list. It processes these inputs to meet the specified format and then presents the result in the web browser.
How to Create a Custom Pipe?
We have created new .ts file with name Sqrt in order to show how custome pipe is created, so create a .ts file and copy below code in it
app.sqrt.ts
import {Pipe, PipeTransform} from '@angular/core';
@Pipe ({
name : 'sqrt'
})
export class SqrtPipe implements PipeTransform {
transform(val : number) : number {
return Math.sqrt(val);
}
}
For creating a custom pipe, we have to import Pipe and Pipe Transform from Angular/core.
In the @Pipe directive, we have to give the name to our pipe, which will be used in our .html file. As we are creating this pipe to find square root hence we will name it as sqrt.
After this there is a class with name SqrtPipe which implements Pipetransform. The class's transform method receives a numerical argument and outputs the square root of that number.
Now as we have created a new file, we have to add the same in app.module.ts. After adding app.module.ts code looks something like this.
import { BrowserModule } from '@angular/platform-browser';
import { NgModule } from '@angular/core';
import { AppComponent } from './app.component';
import { NewCmpComponent } from './new-cmp/new-cmp.component';
import { ChangeTextDirective } from './change-text.directive';
import { SqrtPipe } from './app.sqrt';
@NgModule({
declarations: [
SqrtPipe,
AppComponent,
NewCmpComponent,
ChangeTextDirective
],
imports: [
BrowserModule
],
providers: [],
bootstrap: [AppComponent]
})
export class AppModule { }
As you has already seen in this chapter that we created a class Sqrt class so this need to be added in app.module.ts file and also specify the path of the file and also don’t forget to include it into the declaration as shown in above code
Till here we are done with the code and now we have to do some changes in our html file will will display this result in the browser, so copy below code and paste in your app.component.html file
<html>
<head>
<title>Custome Pipe</title>
</head>
<body>
<h1>Custom Pipe</h1>
<b>Square root of 25 is: {{25 | sqrt}}</b>
<br/>
<b>Square root of 729 is: {{729 | sqrt}}</b>
</body>
</html>
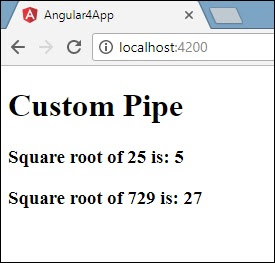
Finally we are done with all the coding, so now run your application using ng serve command and then open browser and hit localhost:\\4200 and you fill find the result as shown below.
OutPut:
Conclusion:
In this article, we discuss what are pipes in angular and also seen how to use it in our application as per our requirement, you also learned that how to create custome pipes using angular 8(you can use any version of angulr to create pipe using this article but make sure that version of Angular should be Angular2 or greater). I hope, this article will help you. Any feedback or query related to this article is most welcome (you can do this by commenting in comment section below or contacting us using contact us page).


